
Parallax Effect
슬라이드를 할 때 버튼이 active 되는 것과, 버튼을 눌렀을 시 부드럽게 움직이는 이펙트를 제작하였습니다.
먼저 기본 사이트를 제작하는 법 이후, Parallax 사이트를 만들 때 사용하는 메서드나 스크립트를 알려드리겠습니다.
01. HTML
active를 줄 메뉴 버튼들과, 각 글귀가 적힌 section와 배경으로 사용할 이미지를 감싸는 박스가 필요합니다.
🐟 HTML 의 코드 보기
<nav id="parallax__nav">
    <ul>
        <li class="active"><a href="#section1">메뉴 1</a></li>
        <li><a href="#section2">메뉴 2</a></li>
        <li><a href="#section3">메뉴 3</a></li>
        <li><a href="#section4">메뉴 4</a></li>
        <li><a href="#section5">메뉴 5</a></li>
        <li><a href="#section6">메뉴 6</a></li>
        <li><a href="#section7">메뉴 7</a></li>
        <li><a href="#section8">메뉴 8</a></li>
        <li><a href="#section9">메뉴 9</a></li>
    </ul>
</nav>
<!-- //parallax__nav -->

<main id="parallax__cont">
    <div id="contents">
        <section id="section1" class="content__item">
            <span class="content__item__num">01</span>
            <h2 class="content__item__title">section1</h2>
            <figure class="content__item__imgWrap">
                <div class="content__item__img"></div>
            </figure>
            <p class="content__item__desc"> 인간은 패배하도록 만들어진 것은 아니다. 인간은 파괴될 지언정 패배할 수는 없다. </p>
        </section>
        <!-- //section1 -->

        <section id="section2" class="content__item">
            <span class="content__item__num">02</span>
            <h2 class="content__item__title">section2</h2>
            <figure class="content__item__imgWrap">
                <div class="content__item__img"></div>
            </figure>
            <p class="content__item__desc"> 사막이 아름다운 것은, 어디엔가 샘을 숨기고 있기 때문이야 </p>
        </section>
        <!-- //section2 -->

        <section id="section3" class="content__item">
            <span class="content__item__num">03</span>
            <h2 class="content__item__title">section3</h2>
            <figure class="content__item__imgWrap">
                <div class="content__item__img"></div>
            </figure>
            <p class="content__item__desc"> 성공 그 자체에 파멸의 불씨가 들어 있을지도 모른다 </p>
        </section>
        <!-- //section3 -->

        <section id="section4" class="content__item">
            <span class="content__item__num">04</span>
            <h2 class="content__item__title">section4</h2>
            <figure class="content__item__imgWrap">
                <div class="content__item__img"></div>
            </figure>
            <p class="content__item__desc"> 삶에 후회를 남기지말고, 사랑하는 데 이유를 달지 마세요 </p>
        </section>
        <!-- //section4 -->

        <section id="section5" class="content__item">
            <span class="content__item__num">05</span>
            <h2 class="content__item__title">section5</h2>
            <figure class="content__item__imgWrap">
                <div class="content__item__img"></div>
            </figure>
            <p class="content__item__desc"> 우리는 인생의 날들을 늘릴수는 없지만, 그 날들에 생기를 불어 넣을 수는 있다. </p>
        </section>
        <!-- //section5 -->

        <section id="section6" class="content__item">
            <span class="content__item__num">06</span>
            <h2 class="content__item__title">section6</h2>
            <figure class="content__item__imgWrap">
                <div class="content__item__img"></div>
            </figure>
            <p class="content__item__desc"> 반복되는 하루는 단 한번도 없다. 그러므로 너는 아름답다. </p>
        </section>
        <!-- //section6 -->

        <section id="section7" class="content__item">
            <span class="content__item__num">07</span>
            <h2 class="content__item__title">section7</h2>
            <figure class="content__item__imgWrap">
                <div class="content__item__img"></div>
            </figure>
            <p class="content__item__desc"> 나는 신념에 가득 찬 자들을 신뢰하지 않습니다. 나는 오히려 의심에 가득 찬 자들을 신뢰합니다.  </p>
        </section>
        <!-- //section7 -->

        <section id="section8" class="content__item">
            <span class="content__item__num">08</span>
            <h2 class="content__item__title">section8</h2>
            <figure class="content__item__imgWrap">
                <div class="content__item__img"></div>
            </figure>
            <p class="content__item__desc"> 인생에 지나가가는 사람들에게 상처받지 말자 그들은 어차피 인생에서 지나가는 사람들일 뿐이다. </p>
        </section>
        <!-- //section8 -->

        <section id="section9" class="content__item">
            <span class="content__item__num">09</span>
            <h2 class="content__item__title">section9</h2>
            <figure class="content__item__imgWrap">
                <div class="content__item__img"></div>
            </figure>
            <p class="content__item__desc"> 네 장미꽃을 그렇게 소중하게 만든 것은 그 꽃을 위해 네가 소비한 시간이란다. </p>
        </section>
        <!-- //section9 -->
    </div>
</main>
<!-- // parallax__cont -->

<aside id="parallax__info">
    <div class="scroll">scrollTop : <span>0</span> px </div>
    <div class="info">
        <ul>
            <li> #section1 offset() : <span class="offset1">0</span> px</li>
            <li> #section2 offset() : <span class="offset2">0</span> px</li>
            <li> #section3 offset() : <span class="offset3">0</span> px</li>
            <li> #section4 offset() : <span class="offset4">0</span> px</li>
            <li> #section5 offset() : <span class="offset5">0</span> px</li>
            <li> #section6 offset() : <span class="offset6">0</span> px</li>
            <li> #section7 offset() : <span class="offset7">0</span> px</li>
            <li> #section8 offset() : <span class="offset8">0</span> px</li>
            <li> #section9 offset() : <span class="offset9">0</span> px</li>
        </ul>
    </div>
</aside>
<!-- //parallax__info  -->
02. Css
css로 이미지와 글귀, 이미지의 조화가 필요합니다. 이번에는 필터를 주어 흑백사진으로 만들어봅시다.
🐟 css의 코드 보기
/* parallax__nav */
#parallax__nav {
    position: fixed;
    right: 20px;
    top: 20px;
    z-index: 2000;
    background-color: rgba(95, 95, 95, 0.4);
    padding: 20px 30px;
    border-radius: 50px;
}

#parallax__nav li {
    display: inline;
    margin: 0 5px;
}

#parallax__nav li a {
    display: inline-block;
    /* width: 30px; */
    height: 30px;
    padding: 5px 20px;
    text-align: center;
    line-height: 30px;
}

#parallax__nav li.active a {
    background: #fff;
    color: #000;
    border-radius: 20px;
    box-sizing: content-box;
}

#parallax__cont {
    max-width: 1600px;
    /* background-color: rgba(255,255,255,0.1); */
    width: 98%;
    margin: 0 auto;
}

.content__item {
    width: 1000px;
    max-width: 70vw;
    margin: 30vw auto;
    /* background-color: rgba(255,255,255,0.1); */
    text-align: left;
    margin-right: 0;
    position: relative;
    padding-top: 10vw;
}

.content__item:nth-child(even){
    margin-left: 0;
    text-align: right;
}
.content__item__num {
    font-size: 35vw;
    font-family: 'Lato';
    font-weight: 100;
    position: absolute;
    left: -5vw;
    top: -16vw;
    opacity: 0.07;
    z-index: -2;
}
.content__item:nth-child(even) .content__item__num {
    right: -5vw;
    left: auto;
}
.content__item__title {
    font-weight: 400;
    text-transform: capitalize; /* 첫글자만 대문자 */
}
.content__item__imgWrap {
    width: 100%;
    padding-bottom: 56.25%;
    background: #000;
    position: relative;
    overflow: hidden;
    z-index: -1;
}
.content__item__img {
    position: absolute;
    width: 110%;
    height: 110%;
    left: -5px;
    top: -5px;
    background-image: url(../../assets/silde/min_jelly/slide_main_07-min.jpg);
    background-repeat: no-repeat;
    background-position: center center;
    background-size: cover ;
    filter: saturate(0%);
    transition: all 1s;
}

.content__item:nth-child(2) .content__item__img {
    background-image: url(../../assets/silde/min_jelly/slide_main_06-min.jpg);
}
.content__item:nth-child(3) .content__item__img {
    background-image: url(../../assets/silde/min_jelly/slide_main_05-min.jpg);
}
.content__item:nth-child(4) .content__item__img {
    background-image: url(../../assets/silde/min_jelly/slide_main_03-min.jpg);
}
.content__item:nth-child(5) .content__item__img {
    background-image: url(../../assets/silde/min_jelly/slide_main_02-min.jpg);
}
.content__item:nth-child(6) .content__item__img {
    background-image: url(../../assets/silde/min_jelly/slide_main_01-min.jpg);
}
.content__item:nth-child(7) .content__item__img {
    background-image: url(../../assets/silde/min_jelly/slide_main_08-min.jpg);
}
.content__item:nth-child(8) .content__item__img {
    background-image: url(../../assets/silde/min_jelly/slide_main_09-min.jpg);
}
.content__item:nth-child(9) .content__item__img {
    background-image: url(../../assets/silde/min_jelly/slide_main_10.jpg);
}

.content__item__desc {
    font-size: 4vw;
    line-height: 1.4;
    margin-top: -5vw;
    margin-left: -4vw;
    word-break: keep-all;

}

.content__item:nth-child(even) .content__item__desc {
    margin-left: auto;
    margin-right: -4vw;
}

#parallax__info {
    position: fixed;
    left: 20px;
    bottom: 20px;
    z-index: 2000;
    background:rgba(0,0,0.4);
    color: #fff;
    padding: 20px;
    border-radius: 10px;
}

#parallax__info li, .scrollTop {
    line-height: 1.4;
}

@media (max-width : 800px){
    #parallax__cont {
        margin-top: 70vw;
    }

    #parallax__nav {
        padding: 10px;
        right: auto;
        left: 10px;
        top: 50%;
        border-radius: 5px;
        background-color: rgba(0,0,0,0.8);
        transform: translateY(-50%);

    }

    #parallax__nav li {
        display: block;
        margin: 5px;
    }

    #parallax__nav li a {
        font-size: 14px;
        padding: 5px;
        border-radius: 5px;
        height: auto;
        line-height: 1;
    }

    #parallax__nav li.active a{
        border-radius: 5px;
    }

    #parallax__info {
        left: 10px;
        bottom: 10px;
    }
}
03. Javascript
패럴렉스에 사용하는 forEach 나 scroll에 관련된 코드는 아래서 설명하겠습니다.
🐟 Javascript의 코드 보기
window.addEventListener("scroll" , () => {
    // let scrollTop = window.pageYOffset;
    // let scrollTop = window.scrollY;
    // let scrollTop = document.documentElement.scrollTop;
    let scrollTop = window.pageYOffset || window.scrollY || document.documentElement.scrollTop;

    // for 문
    // for(let i = 1; i < 10; i++){
    //     if( scrollTop >= document.getElementById("section"+i).offsetTop){
    //     document.querySelectorAll("#parallax__nav li").forEach(li => {
    //         li.classList.remove("active")
    //     })
    //         document.querySelector("#parallax__nav li:nth-child("+ i +")").classList.add("active");
    //     }
    // }

    // forEach
    document.querySelectorAll(".content__item").forEach((el,index)=>{
        if(scrollTop >= el.offsetTop - 2 ){
            document.querySelectorAll("#parallax__nav li").forEach(li => {
                li.classList.remove("active")
            });

            document.querySelector("#parallax__nav li:nth-child("+ (index + 1) +")").classList.add("active");
        };
    });


    // if( scrollTop >= document.getElementById("section1").offsetTop){
    //     document.querySelectorAll("#parallax__nav li").forEach(li => {
    //         li.classList.remove("active")
    //     })
    //     document.querySelector("#parallax__nav li:nth-child(1)").classList.add("active");
    // }
    // if( scrollTop >= document.getElementById("section2").offsetTop){
    //     document.querySelectorAll("#parallax__nav li").forEach(li => {
    //         li.classList.remove("active")
    //     })
    //     document.querySelector("#parallax__nav li:nth-child(2)").classList.add("active");
    // }
    // . . .

        //info
    document.querySelector(".scroll span").innerText = Math.ceil(scrollTop);

    // document.querySelector("offset1").innerText = document.getElementById("section1").offsetTop
    // document.querySelector("offset2").innerText = document.getElementById("section2").offsetTop
    // document.querySelector("offset3").innerText = document.getElementById("section3").offsetTop
    // document.querySelector("offset4").innerText = document.getElementById("section4").offsetTop
    // . . .

    for(let i = 1; i < 10; i++){
        document.querySelector(".offset"+i).innerText = document.getElementById("section"+ i ).offsetTop
    }
});

//스크롤 이동
document.querySelectorAll("#parallax__nav li a").forEach( li => {
    li.addEventListener("click",(e)=>{
        e.preventDefault();
        document.querySelector(li.getAttribute("href")).scrollIntoView({
            behavior: "smooth"
        });
    });
});
Parallax Effect에서 사용되는 브라우저 속성의 스크롤 값과 스크롤 이동시 부드럽게 움직이는 방법
아래 이미지를 보며 원리를 한번 알아봅시다.
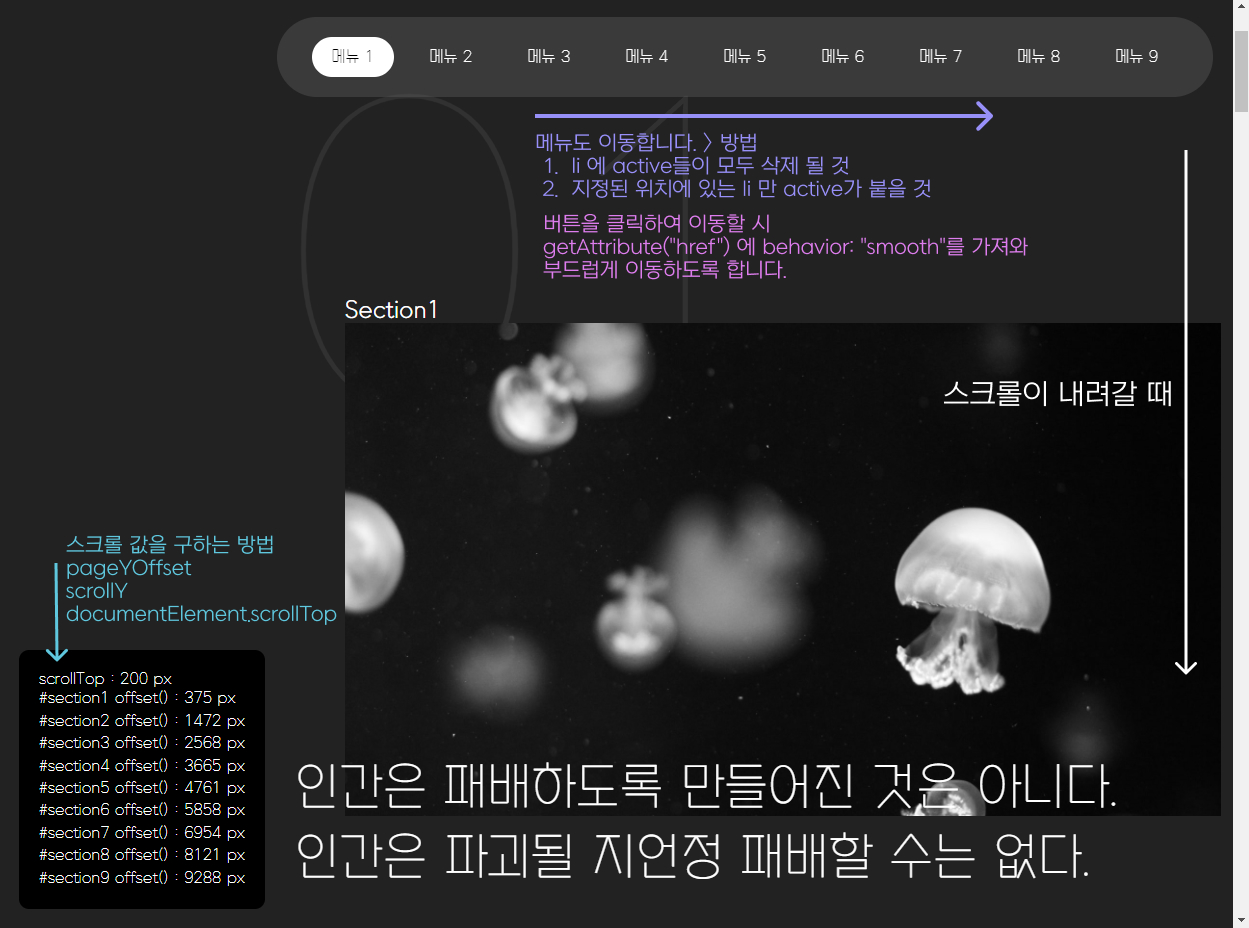
01 ) 스크롤의 높이 값을 구하는 법
let scrollTop = window.pageYOffset;
let scrollTop = window.scrollY;
let scrollTop = document.documentElement.scrollTop;
이 세가지 방법으로 할 수 있지만 한줄로 표현하면
let scrollTop = window.pageYOffset || window.scrollY || document.documentElement.scrollTop; 라는 걸 사용합니다.
이 때, Math.round(), Math.floor(), Math.ceil()라는 걸 사용해 소수점으로 나오는 높이값을 안나오게 만들 수 있습니다.
02 ) 스크롤의 높이 마다, 메뉴가 바뀌는 법
// forEach
document.querySelectorAll(".content__item").forEach((el,index)=>{           //.content__item에서 요소를 가져옵니다.
    if(scrollTop >= el.offsetTop - 2 ){                                                // 브라우저의 최상단에서 스크롤 한 값 > 클래스 요소의 상단과의 거리 값일 때
        document.querySelectorAll("#parallax__nav li").forEach(li => {       //"#parallax__nav li" 에서 모든 active를 지워줍니다.
            li.classList.remove("active")
        });
    document.querySelector("#parallax__nav li:nth-child("+ (index + 1) +")").classList.add("active");  //li의 index 값에 active를 추가해줍니다
    };
});'Effect' 카테고리의 다른 글
| Parallax Effect 03 (3) | 2022.09.12 |
|---|---|
| Parallax Effect 02 (10) | 2022.09.08 |
| 마우스 이펙트 01 (2) | 2022.09.05 |
| 이미지 슬라이드 유형 03 (5) | 2022.09.02 |
| 이미지 슬라이드 02 (4) | 2022.08.29 |


댓글